Tim's Opel GT Site - Kadett Heater System (page 2)
 12-7 Blower Switch Removal and Installation 12-7 Blower Switch Removal and Installation
1. Disconnect battery.
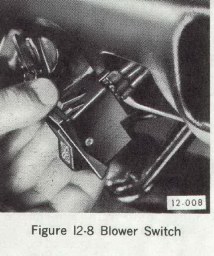
2. Reach under lower instrument padding, push blower switch out from rear and disconnect wires. See Figure 12-8.
3. Install in reverse sequence to removal.
12-8 Heater Controls, (lever arms and control cables). Removal and Installation.
Figure 12-8
|
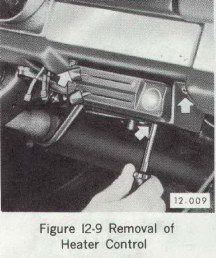
Figure 12-9
|
|
|
|
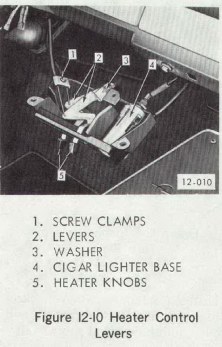
Figure 12-10
|
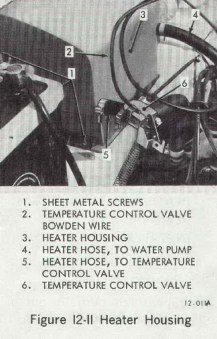
Figure 12-11
|
|
|
|
a. Heater Control Lever Arms and Control Cables
1. Disconnect battery.
2. Disconnect cigar lighter wire from fuse block.
3. Remove two nuts, one on each end of lower instrument safety cushion and two screws, one on each side of heater control on underside of lower instrument padding.
4. Pull lower instrument padding towards rear of car compressing the six retaining clamps. When lower instrument cushion is pulled out, disconnect wires to heater blower switch.
CAUTION: Be careful not to damage lower instrument safety cushion when removing.
5. Remove three screws securing heater control assembly to instrument panel. See Figure 12-9.
6. With control assembly detached from instrument panel, remove screw and clamp that holds control cables and unhook control cables from heater control assembly. See Figure 12-10.
7. Remove lever arms.
a. Pull heater control knobs off lever arms.
b. Remove lock washer from pivot pin and push out pivot pin.
c. Remove lever arms.
d. Install in reverse sequence to removal.
8. Heater control cable removal.
a. Remove remaining connected end of heater-defroster control cable by removing clamp on left side of air distributor housing, remove rubber ring on distributor door lever pin and slide wire off air distributor door lever.
b. Remove remaining connected end of water valve control cable by disconnecting end of water valve and pulling wire through dash. See Figure 12-11.
c. Install in reverse sequence to removal.
12-9 Heater Core or Housing Removal and Installation
1. Disconnect lower radiator hose, drain and collect coolant.
2. Loosen heater hose clamps, (See Figure 12-11) and remove hoses.
3. Remove screws securing heater housing to dash and remove housing.
4. Remove heater core.
5. Install in reverse sequence to removal.
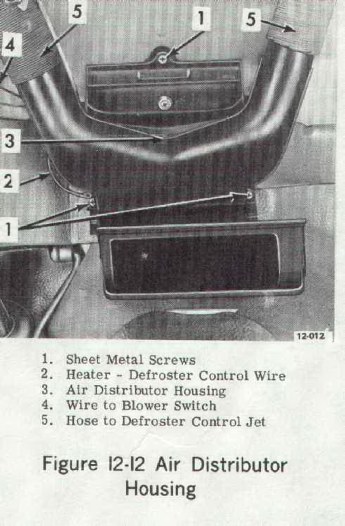
12-10 Air Distributor Housing or Blower Motor Removal and Installation
Figure 12-12
|
|
|
1. Disconnect wire (4-Figure 12-12), leading to blower from blower switch.
2. Disconnect control cable (2-Figure 12-12) from air distributor door.
3. Remove screws securing air distributor housing to dash (1-Figure 12-12) and partially remove housing from dash.
5. Remove screws securing blower motor to air distributor housing and remove motor.
6. Install in reverse sequence to removal.
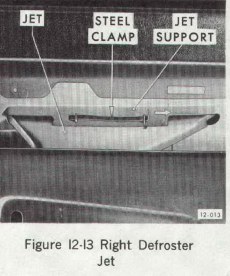
12-11 Defroster Jet Removal and Installation
1. a. (Right Jet) Remove glove box.
b. (Left Jet) Remove instrument housing as described in Group 120, Section D.
2. Pull steel clamp out of jet support and remove jet. See Figure 12-13.
3. Install in reverse sequence to removal.
Figure 12-13
|
Figure 12-14
|
|
|
|
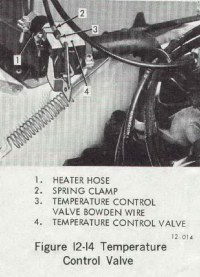
12-12 Temperature Control Valve Removal and Installation
1. Drain and collect coolant.
3. Loosen heater hose clamps and remove valve from hoses.
4. Install in reverse sequence to removal.
DIVISION V
Trouble Diagnosis
12-13 Heater System Trouble Diagnosis
TROUBLE
Temperature of heated air at outlets too low.
CAUSE AND CORRECTION
Check radiator cap for proper sealing action and replace if necessary.
Check for adequate coolant supply and refill if necessary.
Inspect hoses for kinks and relieve kinks or replace hoses as necessary.
Check thermostat operation by measuring temperature of coolant at radiator. Temperature should be within 5 degrees F. of thermostat rated value.
Check that air doors and water temperature control valve are operating properly.
Check for plugged heater core and backflush if necessary.
TROUBLE
Inadequate defrosting action
CAUSE AND CORRECTION
Examine heater-defroster door for proper adjustment and adjust Bowden Cable as required.
Check that air hoses connecting to defroster outlets are secure.
Check for air leaks around edges of heater air distributor housing and seal leaks as necessary with body sealer.
TROUBLE
Blower is inoperative
CAUSE AND CORRECTION
Check the blower fuse and replace if necessary.
Check wiring for open circuit and correct as required.
Inspect for defective component (i.e., blower switch or blower motor) and repair or replace as necessary.
|