Windshield Wipers
Description and Operation
 10-2 Description and Operation of Wiper Motor 10-2 Description and Operation of Wiper Motor
a. General Description
1. The two-speed wiper consists of a round shaped permanent magnet type motor and speed reduction gearbox.
b. Operation
1. The wiper motor is controlled through a dash-mounted switch on all cars. The Opel Rallye and GT, in addition to the dash-mounted switch, also have a switch mounted in conjunction with the windshield washer foot pump. Depressing the washer pump will allow the wipers to operate while the pump is depressed.
10-3 Removal and Installation of Kadett Wiper Transmission
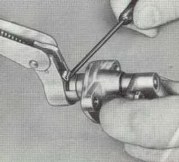
1. Tilt wiper arm, with blade, away from the windshield.
Figure 10-1
|
Figure 10-2
|
|
|
|
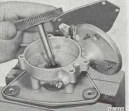
2. Lift retaining spring out of groove in drive shaft. Lift off wiper arm. See Figure 10-1.
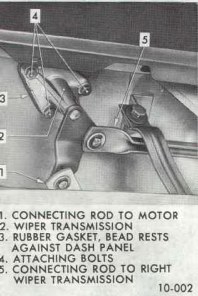
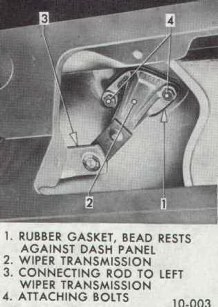
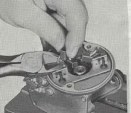
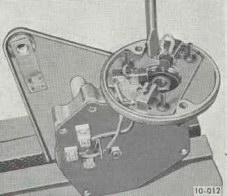
3. Remove clip (or clips) retaining connecting rod (or rods) to wiper transmission. See Figures 10-2 and 10-3.
4. Remove Transmission.
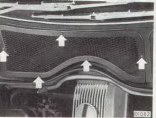
a. For left side transmission, remove three (3) screws holding transmission to back of dash. See Figure 10-2.
Figure 10-3
|
Figure 10-4
|
|
|
|
b. For right side transmission, remove two (2) screws holding transmission to back of dash. See Figure 10-3.
5. Install in reverse sequence to removal, checking all rubber gaskets, plastic rings, washers and retaining clips for wear. Replace if required.
NOTE: Install wiper arm so that there is 7/8 to 1-5/8 inches of clearance between wiper blade and windshield rubber channel when wiper arms are in park position.
10-4 Removal and Installation of Wiper Motor
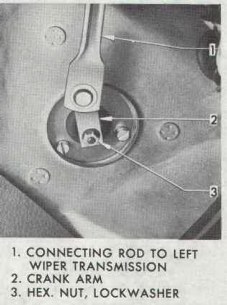
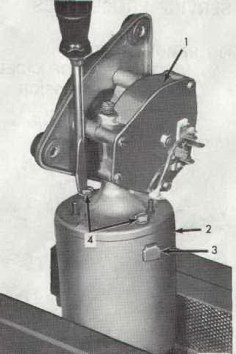
1. Remove crank arm hex nut and crank arm from wiper motor drive shaft. See Figure 10-4.
2. Remove connector from motor terminals. Remove ground wire from terminal plate attaching screw.
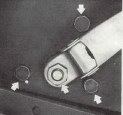
3. Remove three (3) nuts attaching wiper motor to dash panel. See Figure 10-5.
Figure 10-5
|
Figure 10-6
|
|
|
|
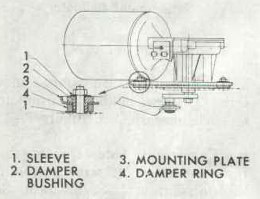
4. Install in reverse sequence to removal, paying attention to proper installation of individual rubber damper and sleeve parts. See Figure 10-6.
10-5 Removal & Installation of Opel GT Wiper Transmission
Figure 10-7
|
Figure 10-8
|
Figure 10-9
|
|
|
|
|
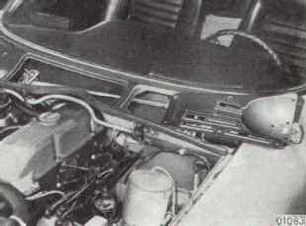
2. Remove three (3) bolts from each windshield wiper transmission and drop wiper transmissions from deflector panes.
4. Remove center deflector panel. Remove left deflector panel together with wiper motor and complete wiper linkage. See Figure 10-10.
Figure 10-10
|
|
|
5. Remove nut and lock-washer from wiper motor shaft and remove complete wiper linkage.
6. Install in reverse sequence, checking all parts for wear. Replace any worn parts.
10-6 Removal & Installation of Opel GT Wiper Motor
2. Disconnect electrical wires from wiper motor.
3. Remove three (3) bolts and remove wiper motor from left deflector panel.
4. Install in reverse sequence, making sure all rubber is in good condition and is placed properly.
10-7 Disassembly of Wiper Motor (Kadett and GT)
1. Remove two- (2) motor housing attaching screws and angle brackets. See Figure 10-11.
Figure 10-11
|
Figure 10-12
|
|
|
|
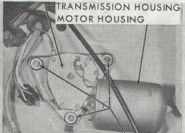
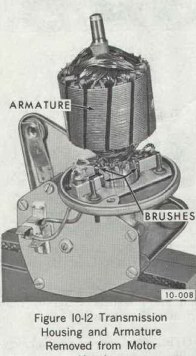
2. Remove transmission housing together with armature from motor housing. See Figure 10-12.
NOTE: It may be necessary to hold armature in transmission housing with a screwdriver.
3. Remove armature from transmission housing.
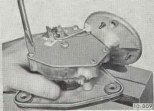
4. Remove five (5) transmission housing cover screws. See Figure 10-13.
Figure 10-13
|
Figure 10-14
|
Figure 10-15
|
|
|
|
|
5. Remove cover, gasket and driven gear from transmission housing. See Figure 10-14. Remove pivot ball from driven gear. See Figure 10-18.
6. If required, remove brushes.
a. To remove positive brushes, cut brush leads off at brush holder. See Figure 10-15.
b. To remove negative brush, remove brush-retaining screw from commutator end frame. See Figure 10-16.
Figure 10-16
|
|
|
|